Friday, January 27, 2012

KINDLE/NOOK COVER

I made this Kindle/Nook cover because I mis-measured a piece of fabric and didn't want to waste it.  I don't even own a Kindle or a Nook ... yet!

This is my first attempt at writing a "big" tutorial.  It was a challenge to try to put in writing the stuff I usually do by instinct and experience.

The crazy thing about that is I have been a school teacher for the past 27 years and have taught language arts specifically for the past 12 years.  We always have to write a "How-to" essay and it's one of the most difficult thing for kids to do.  It's not easy for adults, either!

I had to borrow my sister-in-law's Kindle to take this photo.

So here goes!  I hope it you can understand my directions. AND I would really appreciate any constructive feedback you can provide.

Directions for a Kindle/Nook Cover:

Materials needed:
Main fabric - 16" x  9"
Fabric for lining – 16” x "9"
Fusible interfacing - 16" x 9"
Fusible fleece - 16" x 9"

2" x 30" strip of complementary fabric for binding
Velcro - appox. 1" strip
Matching thread

All seams are 1/4"

 
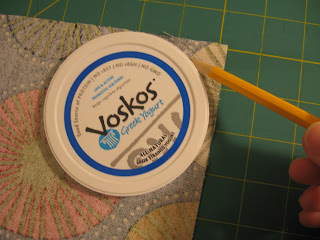
Once you cut your fabric, round the edges of the corners of top side of the fabric.  As you can see, I used a yogurt top. You can use any round shape that suits you.


 Lay your main fabric on top of the lining and use it as a pattern to cut out the lining fabric.  


The rounded edge is the TOP of your piece, the straight edge is the BOTTOM.

Iron the fusible interfacing to the WRONG size of the main fabric according to the directions.


Iron the fusible fleece to the WRONG side of the lining.  Leave a small margin around the edges, so the seams won't be too bulky when you sew the sides together.


Sew one side of your Velcro strips to the RIGHT side of the lining about 1 inch from of TOP edge, and be sure to center it.


Place the main fabric and lining with the RIGHT sides together and sew a seam along the BOTTOM straight edge.
Fold back the seams, and with WRONG sides together, press the seam and top stitch along the BOTTOM straight edge. 


Stitch around the all the raw edges to keep the front and back secure. 
 

Sew other piece of Velcro to the right side of the main fabric 2 inches from the bottom edge.  Be sure to center it.


Measure 6 inches from the bottom and fold the edge up to create the envelope/pocket for the e-reader.  Stitch along the side edges to close the pocket.


Time to make the binding:
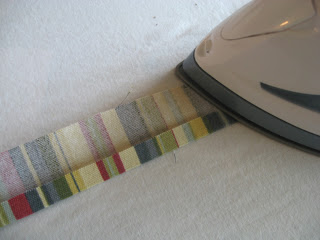
Take the 2” x 30” fabric strip and fold it in half and press with iron.


Open it up and press edge to crease in the middle. 

 Repeat for other side.


Open up binding tape and pin around unfinished edges of pouch and stitch.  Use the fold as your seam guide.

 
Fold the binding over the raw edges.


I like to use Steam-a-Seam to hold everything down before I sew. Or you can just pin it.


Stitch the binding closed around the edges.


You’re finished! 


Friday, January 13, 2012

Diaper Bag using a pattern

I finished this diaper bag for my step-daughter a few weeks ago, but really couldn't show it off until I gave it to her at her shower.

I used Butterick Pattern B5005, but made a few changes.  I haven't used a store-bought pattern in years and now I know why.  They are a pain in the butt.  I discovered that I have little patience for the extra steps of cutting out the pattern pieces, then laying them out, and then cutting the fabric. But, patterns are necessary.  I like to follow a pattern the first time I try one, but after that I make changes.
This pattern was easy enough to put together.  I will definitely make this bag again, but with changes.  And, I probably won't use the pattern.


I changed the side pockets by adding elastic gathering.  I didn't like the idea of more ribbons to tie or the open pockets like the pattern choices. You might be able to see the side pockets in the pattern picture above.

I also added outside pockets to both front and back sides of the bag.  The pattern only called for pockets on one side.

The inside of the bag is a matching fabric of polka-dots.  I added a hook for keys, since I hate digging for my car keys in my purses and bags.


Here's a look at the inside of the bag with all the extras I made to go along with it.

I made a little "binky" bag, a changing pad, 3 burp rags, and a wipes cover to go with the set.

 I think she liked it!!

Sunday, January 8, 2012

Easy to Make Fabric Coasters

Here's an easy way to make coasters.  Use them for yourself or give them as gifts.  There is even a no-sew option.

Materials needed to make 4 coasters:
Cotton fabric cut into 5" squares. 8x
Pellon Pelex ultra firm stabilizer, cut into 4" squares. 4x
Fusible webbing like Steam-A-Seam or Stitch Witchery, cut into 5" squares. 4x
Matching thread
Pinking shears

Fuse the Peltex stabilizer to the WRONG side of one of the 5" squares according to the manufacturer directions.


Iron fusible web to WRONG side of other 5" square according to the manufacturer directions 
Place WRONG side of both 5" squares and fuse fabrics together, following manufacturer directions.


Once both sides are fused, you can trim the raw edges with pinking shears and you are done. This is the no-sew option.


BUT, I like to add a top stitch around the edges for more detail.
 
Stitch a 1/2" seam around the raw edges of the 5" square.  You can add another seam at 5/8" if you like for a nice double top-stitch seam.


When done with top-stitching, use pinking shears to trim the raw edges of the square.

Your coaster is finished!  Repeat this process for each coaster.


Another option is to create a round coaster.  You use the same procedure above to put the pieces together. Cut a 5" circle of fabric instead of a 5" square.  I use a CD as my template.


Cut a 4" diameter circle of the Peltex stabilizer.


Once the fabric pieces are fused, you can trim the raw edges with pinking shears. 
OR You can add a decorative stitch around the edge of the circle, if you like.  Be creative!


Trim the raw edge with pinking shears when finish with top-stitching.


Finished products.
Kind of reminds me of Nonna's ravioli.

Saturday, January 7, 2012

Happy Birthday to Me!

Today I turned 52.  Happy Birthday to me!! To celebrate, my husband and I took a speedboat "adventure" in the S.D. harbor today.  My first time driving a boat.  I went into it with a little trepidation, since I had NO IDEA what I was doing behind the wheel of a boat. It took a little while, but I got the hang of it and was able to maneuver that little boat through the harbor - and on full throttle. What a BLAST! 

My birthday gift to myself was this blog. Strange gift, but I decided to try something completely out of my comfort zone and this is definitely it.  Like the boat adventure, I am entering the blogging world with a little trepidation.  I am sure after a while, I will be able to maneuver my way through this sea of blogging.

I love to sew and that is the reason for this blog.

Sewing has become a passion for me again (I've been away from it for about 20 years). I decided, like millions of others around the world, to share my ideas on a blog.  My future posts will include directions for sewing projects and whatever else I can think of related to sewing and crafting.

I survived the boating adventure.  So, here goes....